Foraging for a Meal

Foraging for a Meal
Foraging for a Meal at 30 below!

Saturday, April 30, 2016

Orange and Black Reef Swimmers - Sea World + a new "click" to try

Today I am sharing a little visual diversion -

How fun it is to compare the still vs. video images of the same subject.  The reef fish in these two images provide the perfect opportunity to enjoy the differences. 

Sea World in "Aquarium" attraction - orange and black fish - still image.
Once you click on the video below, there is also sound - short and sweet!


Hope you enjoyed the comparisons!  I would love to say that I captured these wonderful images while SCUBA diving; I was on a stroll through an exhibit at Sea World, in Orlando!

Friday, April 29, 2016

Stack

Sometimes stacks, when full fused, melt down to some visually interesting shapes and colors.  It is  surprising to me that each color in the stack retains a distinct separation from it's neighbors in the final puddle.   The mobility seems to depend on the laws of 1/4 inch and gravity.  Take a look at the tilt of the French vanilla, transparent and and white/salmon streaky in the left hand corner of the fire paper in the picture below, then watch for the end result.
Transparent, French vanilla and white/salmon opal streaky stack before firing - upper left hand corner.
Below is the stack from a bird's eye view.  Notice that the squares in eight of the nine layers are staggered so that the final shape is less likely to be square.

Transparent, French vanilla and white/salmon opal streaky stack before firing - view from above
The only piece of glass that is a different thickness is the white/salmon opal on the top - it is only a small piece and is turned on it's side.  Looking at it from the top, you can actually see the layers in the glass that categorize it as a "streaky" sheet.

Transparent, French vanilla and white/salmon opal streaky stack before firing.
Just the slightest off center placement of the white/salmon opal is enough to pull the entire stack the direction of the "lean" when the temperature rises.  Check out the final piece below and the flow of the tilt is apparent.

Transparent, French vanilla and white/salmon opal streaky stack before firing.
If you look carefully, you can actually count each of the nine layers in the final piece, however.  Even though they worked to achieve the 1/4 inch thickness, the integrity  of each layer in the stack is discernible. 

Transparent, French vanilla and white/salmon opal streaky stack after firing.
I would like to try another stack or two until I get one that does not tilt to one side, but creates concentric shapes, rippling from the middle - at least that is my expectation.

Thursday, April 28, 2016

White/Salmon Opal - I think PINK!

It's a little stretch, but the pre-fired streaky glass is called white/salmon so I trusted the name.

Earrings using white/salmon opal streaky glass with transparent cap - pre-firing
I am not seeing salmon in the fired results, however......see below.

Same earrings using white/salmon opal streaky glass with transparent cap - post-firing
Pink????

Pendant and earrings together, post firing.
Salmon?????
Second earring set - still pink.......


Wednesday, April 27, 2016

Streaky Glass is NOT Striker Glass!

Although I am not a pink person, I was intrigued by the pattern in a piece of white,salmon opal glass at the local glass shop.  Like so many stiker-type glasses that turn some shade of orange when heat is added, I assumed that a glass with salmon in it's name would veer toward orange tones. 

Scrap pendant using transparent, French vanilla and white/salmon opal streaky glasses - pre-firing.
I used the largest portion of the piece for a nightlight and a dish and decided to use the scrapes to make a peachy/salmony necklace.  I fired the dish first.  It included a fabricated image on the surface that incorporated red, brown and orange pieces of glass. It looked "shrimpy" in color and worked for the purpose I intended.  I fired the nightlight next.  look to the right to see a glimpse of it before firing. 

Firing smaller pieces resulted in a product different than I expected, however.  With no orange, brown or orange for contrast (only French vanilla and transparent,) the white,salmon opal look mighty pink to me.

Scrap pendant using transparent, French vanilla and white/salmon opal streaky glasses - pre-firing.

As you can see in the pieces below, the darker streaks in both the pendant and earrings are a pretty intense pink - not orange or salmon. 

Scrap pendant using transparent, French vanilla and white/salmon opal streaky glasses - pos-firing.
Scrap earrings using white/salmon opal streaky glass - post firing.
 Perhaps the book title, "When I am Old, I Will Wear Purple," will change in practice to , "When I am Old, I Will Wear Pink," in, my world - although I have to say purple is looking more and more appealing all of the time.  Perhaps Prince was on to something!


Tuesday, April 26, 2016

Dots, Dots and More Dots!

I finally dedicated some time to the creation of dots.  In the past when I have needed a small circle or two, I just haven't had one handy.  At the end of one Saturday morning studio session, I had a few extra minutes and so pulled lots of small scraps and cut them into even smaller pieces.  It is the easiest to glue them to a piece of shelf paper so that moving them from a table to a kiln self is painless.

Scraps attached to shelf paper and ready to go into the kiln.
Above is one of the 3" X 4" pieces of shelf paper I filled with small pieces of glass in preparation for creating a dot warehouse - OK, a mini dot warehouse. 

Below you will see the results of my efforts, and if you care to take the time, you can match the pre-kiln pieces to the post-firing dots.  Studying these small pieces in this way is actually a great way better understands the properties of glass when heat is added.

Look above at the row of orange chunks.  You'll notice that those that start rectangular become oval or eliptical in shape while those that start as triangles tend to remain near triangles. 

Orange dots after firing.

This study is a great reminder that, when molten, glass is a fluid and assumes the properties of a fluid.  When molten, the glass molecules pull together to form the smallest shape possible; contact with the paper underneath interferes with the pieces forming pearl-shaped marbles, however.  Gravity wins again.

Medium blue dots after firing.
You can run the same comparison with the blue dots, doing a before and after comparison.

Burgundy dots after firing.
The burgundy dots were from a second 3" X 4" sheet of scrap pieces. 
French vanilla dots after firing.
The French vanilla shapes above also started on the sheet above..if you are comparing, you'll have an added challenge, because all of the "after firing" dots are not here.

Dot party!!!!

Any time I have an inch or two of space on a firing sheet, I pull out my small scrap pieces and plan for a few more dots members.  I am not sure which I learn more from, the before and after study of the dots or the stacking and manipulating of layers......it's all learning!  (Notice what the scrap opalescent pieces did....the glass underneath is black, but the coating on the surface melts at a different temperature and those molecules did NOT pull together to form the smallest shape - interesting, ah?)

Monday, April 25, 2016

Thoughts of Mixed Media - HMMMMMM

This piece was initially designed to be a pendant.  Once fired, however, I saw it differently.  Pre-firing, the overall shape was rectangular.  I assumed it would fire with rounded edges, but maintain the straight sides of a rectangle.

Scrap glass in horizontal composition - pre-firing
The 1/4 inch rule, once again prevails, and the layers of glass flowed toward achieving the 1/4 thickness across the length of the piece.  The results was near uniform thickness, but a pulling-in effect in those spaces that had less volume of glass to create the 1/4 thickness. 

Scrap glass in horizontal composition - post-firing

As I turned this piece in my hands after firing (and cooling!),  the logical view changed from horizontal to vertical and my thoughts began to center around mixed media.  What if this became the anchor portion of a small piece that has personified attributes.  A piece with glass appendages would be too delicate and impossible to wear, for example, but with metal legs and arms it would be much more durable.  It might be too large to be an accessory piece, however, but could be a small, frameable piece.  I have begun sketching some possibilities to explore some options.  As always, the challenge is now more complex because of the financial implications.....a $12 dollar chunk of fused glass with $20+ dollars of wire and feathers may be creative, but highly impractical.........Sketching may be as far as the development of this piece extends!

Scrap glass in turned vertically, and presenting new potential   - post-firing


Sunday, April 24, 2016

It's Always About the 1/4 Inch - Glass 101

Each of the 3 layers of this pendant (not including the freeform stringer,) began as rectangular pieces.  That really means that the top half of the piece is two layers and the bottom half, with the orange "oreo filling" is three layers.

3 layer pendant using scrap - pre-fired
As you look at the shape of the piece after it is fired, below, you probably noticed that the overall shape is no longer rectangular, but irregular. 

3 layer pendant using scrap - post firing
This goes back to the glass rule:  molten glass flows to 1/4 inch in thickness.  If you think about the volume of glass by dividing the top and bottom half of the pendant, there is 1/3 more glass in the bottom than in the top.  Two pieces of 3mm glass, layered one on top of the other, full fuse to just about 1/4 inch.  Adding a third piece of 3mm glass, in this case, lets say it is the orange piece on the bottom half, the glass, when molten, is now about 5/8 of an inch thick - NOT allowed in the world of glass.

If this piece were dammed to keep the glass from flowing, the shape would have remained rectangular, but the bottom half would be thicker than the top half.  Since no dam was created to restrict the glass flow, in the kiln, the hot glass continued to flow until the 1/4 inch rule was achieved.  The color of the glass does not seem to impact this rule, but some coatings seem to have some effect.

For example, the iridescent coatings are frequently on black glass.  The glass portion follow the 1/4 rule, but the irid coating seems to seek the smallest surface and frequently pulls and puckers toward the center of the irid section.  The opalescents seem to react the same way as the irids.  I have observed pieces where the irid and opalescent coatings appear to crack and draw toward pockets on the surface - these have been larger pieces.  I imagine this has as much to do with the speed of heating to the highest temperature, the length of time the glass "sits" at the high temperature, and it could also be connected to the speed of cooling.


Saturday, April 23, 2016

Still Learning from Scrap

I loved this triangular shard and decided to leave it just as it was, but repurpose it.  I assumed all of the harsh corners would round in the firing process, but hoped the overall image would remain in tack and  maintain the color contrast.  Since French Vanilla does react with some colors, I was concerned that the post firing result would be one big amber rectangle. 

Scrap pendant using French vanilla, amber streaky and transparent clear - pre-firing.

Although the amber glass is wider and the top of this pendant, and therefore contains a greater volume of glass, it is interesting that it has not created an irregular shape in the overall pendant like many of the earlier scrap examples.  Initially it seemed as though the transparent cap on the top help minimize the irregular shapes, as it has in this one, but the earlier orange and green/black were both misshappen.  More experimentation needed!!

Scrap pendant using French vanilla, amber streaky and transparent clear - post-firing.

Friday, April 22, 2016

Learning from Scrap

Once again, I can learn a lot from a little left over scrap glass. 

Scrap pendant using French vanilla, amber streaky and transparent clear - pre-firing.
Notice the location of almost all of the bubbles after the firing process; each is in the border between the French Vanilla and the amber streaky glass.  Did these two glasses react, was there still moisture in the adhesive the was seeking an escape rout, or....???????????
Scrap pendant using French vanilla, amber streaky and transparent clear - post-firing.

Thursday, April 21, 2016

Opalescent AND Iridescent Combo

In these pieces, the opalescent plum glass has been combined with a second type of speciality glass called irid.  Irid is short for iridescent and is a coating added to one surface of sheet glass.  Unlike opalescent glass, which has a consistent surface for the full length of one side, irid sheets vary in appearance from edge to edge and from sheet to sheet.

Scrap earrings using plum opalescent, purple iridescent and transparent clear - pre-firing.
The earrings above are made with three layers.  The bottom layer is the plum opalescent glass, the smaller rectangle in the middle is plum irid, and the top cap is thin clear.  In the previous test piece,  the plum opalescent turned a little bluer purple and revealed some surface sheen not present in the pre-fired glass.

Scrap earrings using plum opalescent, purple iridescent and transparent clear - post-firing.

It was pleased to see that even covered by the clear cap of glass, the opalescent glass was consistent in the heat-induced changes and the irid's metallic surface properties have been heat-activated and are not suppressed by the addition of the transparent cap.

Notice, also, that the right-angle corners are much less harsh after firing since all layers of glass now have rounded corners. 

Wednesday, April 20, 2016

Opalescent Characteristics Revealed

I only bought a small piece of this glass because it is one of those that fires to a different color than it starts.  This is plum opalescent sheet glass, which is designed to reflect light. 
Scrap pendant using plum opalescent and transparent clear
As you can see in the piece above, the plum rectangle looks drab and transparent.  Even with the transparent piece of glass over it, the color remains blah and transparent.  The reflected light in the center of the bottom is actually marking ink that is supposed to burn off in firing.

Scrap pendant using plum opalescent and transparent clear
It was a fun discovery to see the result after firing. Notice the difference in the color of the glass; it is a little more purpley, and the surface is more mirror-like.  I was dissappointed to see that the marking pen did NOT burn off, however.  I am glad this is a test piece and not a major piece of jewelry or serviceware! 

Tuesday, April 19, 2016

Wall Vase 2

Unlike many stand-alone vases, this one is not able to have the "hour-glass" shape.  In fact, the potential for success is the greatest if the shape tapers, with the opening at the top being the largest location.  Here's why:  when the fiber paper is placed on the flat pieces of glass AND flat pieces of glass are position on top, everything moves very easily.   Once fired, the glass droops and oozes downward (think gravity,) filling every nook and cranny accessible.

 If the fiber paper "fudgecicle" is centered perfectly underneath the flat glass sheet above it and there is a flat piece position below, then when the piece is fired, the fiber paper will be perfectly enclosed inside the newly formed glass shape - there will be no opening to remove the fiber paper.  For some applications this newly formed 3-D shape may be desirable, but for a flower container, not so much.

Not only does the fudge-cicle need to be tapered, but it also has to be placed on the bottom sheet of glass in a way the allow the cicle to protrude an inch or so beyond the desired mouth of the vase to ensure that there will be an opening with no shard-like edges. 

In the side view, above, you can see the smooth rounding of the mouth of the opening.  Also notice the opening between the blue rabbit-ear shapes.  A second piece of fiber paper was placed in this space pre-firing to keep the edges of the opening as thick as possible and keep the space open for future wall-hanging possibilities.


Unlike a free-standing vase, this sconce-style wall vase has a flat back but it can hold water.  I am not sure
 that the glass bar across the top would be able to support the weight of water and flowers - I think I would want to embed firing wire into the design to strengthen the opening.  Wire could actually be added at this point as an embelishment to strengthen the piece.  I tried many new things in this piece and functionally  each experiment was successful...now aesthetically...................................that's a different discussion!

Monday, April 18, 2016

Wall Vase

When I first started working with glass, I was interested in creating a wall sconce or vase (AKA "wall pocket) that could hold dried flowers.  Because I was new to understanding the properties of glass, I needed to learn how to create a vessel that would not collapse when fired, how to create an opening for a nail on the wall, and how to create dimension in the vessel.

Wall vase opening created by shaping fire paper in the form of the interior of the vessel container.  This is the image after firing.
Layering and adding glass does not resolve any of the three goals.  By observing the work of others, that maintaining a dimensional space, as shown in the picture below, required using fiber paper in the pre-firing construction.  I also learned that using Elmer's blue gel glue and scotch tape helps hold fiber paper and glass in place without damaging the final product.

Wall vase opening created by shaping fire paper in the form of the interior of the vessel container.  This is the image after firing.
By folding fiber paper to make a fudgecicle shaped brick, a piece of collage glass could be taped over the top with the intention of creating a glass "pocket" once fired. 

Wall vase opening created by shaping fire paper in the form of the interior of the vessel container.  This is the image after firing.
As you can see in the image above, the fudgecicle brick has been removed, but the shape of the brick has been retained and vitrified in the shaped glass.  The next challenge to tackle is to create an opening to suspend the piece. 

Sunday, April 17, 2016

Detective Needed

The properties of glass remain consistent, however carefully observing individual pieces prior to firing is essential for accurate operator predictions.

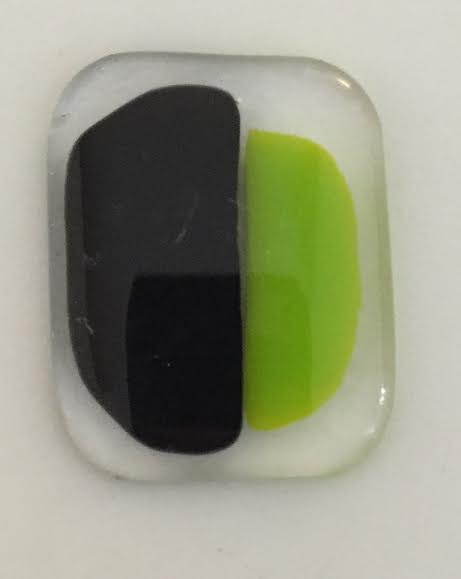
Scrap pendant - black, green and transparent - pre-firing
There are four pieces of glass in the piece above:  a think, transparent rectangle is on the bottom, a cut black rectangle is sandwiched in the middle along with a scrap edge of green, and a cap of thin, transparent caps everything.

The prediction was that the corners on the clear would be slightly rounded, the corners on the black would be very slightly rounded, the uppermost corners on the green would be slightly rounded, and the irregular edge of the scrap green would look much as it does pre-firing.

Scrap pendant - black, green and transparent - post firing.  Horizontal
Post-firing I had a need to do some analysis because the piece did not look quite like I expected.  The part that surprised me was the shape of the black rectangle on the top corners.  I am now wondering if the firing temperature of the black is a little lower than the transparent and the green.  Did the outermost corners of the black reach their melting temperature before the bottom part???  This would account for the rounding of the top corners and not the bottom corners.

Could the glass have appeared to be  a consistent thickness, but really be inconsistent????  Since most of the pieces am using to run these tests are in my scrap container, it is possible that this piece of black was close to an edge when manufactured, and parts are slightly thicker than others.  This idea seems more unlikely than the temperature idea, however, because all four edges of the black rectangle were cut; there was not one raw edge in the black like there was in the green. 

Scrap pendant - black, green and transparent - post firing.  Vertical
The original plan was to suspend the pendant vertically, but I am not sure it works that way once fired.  Horizontally, with the black at the top, also allows for discrete placement of the bail.

Four pendants attached to fire paper and ready to go in the kiln; green and black in transparent in upper right

The four pieces above were all fired together on this piece of fire paper.  Notice the location .  of the black and green pendant - it adds further evidence to support the hypotheses that the black reached a higher temperature first and reacted an an independent piece.

If the temperature theory is plausible, is uneven heating in the kiln the cause, do dark colors heat faster than non-dark colors of glass, or do the chemicals in each piece of glass significantly effect firing temperatures????? 


Saturday, April 16, 2016

Vintage #2

This piece was also created 2 ago and after the first firing, had significant damage.  As with the piece  featured yesterday, bubbles made the piece unattractive and dangerous to use. 
Revisiting of 2014 damaged single-fired glass composition.
Since this piece was also three layers deep, grinding off a lot of the top layer did not significantly alter the glass in the middle layer, which makes up the majority of the image/composition.  this piece was also very irregular around the edges, so I ground them off until the piece was squarish.
Revisiting of 2014 damaged single-fired glass composition
After the 2016 firing, I considered grinding out the new bubble and trying again.  I decided to slump the square instead and see if additional bubbles rose to the surface - they did not.  I could still grind lff the bubble top, but would need to fire the piece 1 fourth time.
Revisiting of 2014 damaged single-fired glass composition.
 For now, I am leaving this piece the way it is.  It, too, is right up there in the Waterford Crystal category for cost.  More think-time required!


Friday, April 15, 2016

Revive or Recycle???

The beginning of the piece shown below was actually first-fired-fused two years ago.  During that fusing,  one large bubble appeared that was about 1/2 X 3 inches and two smaller bubbles, each about 3/8 X 1 inch.  Several times this piece was headed for the scrap bin, and each time I set it aside for another day.

Vintage 2014 with a little repair work
This year I decided to try a repair. After the 2014 firing, the piece was flat, so this year I began by placing it on the disk grinder.  It wasn't long before the bubbles bumps were gone.  Where the bubble structures had been, there were deep pits.  The surface around the pits was rough, since the grinding wheel has also removed some of the surface glass.   Initially I had regretted building a three layer piece.  Now, I was glad that the uppermost layer of clear glass gave me so repair "breathing space."
Vintage 2014 with a little repair work
 I carefully overfilled each of the bubble pits with clear fine frit and placed the flat square back into the firing line-up.  It was a pleasant surprise to see that the re-fired square was smooth and shiny across the surface and the bubble pits had not left any depressions. 
Vintage 2014 with a little repair work
I decided to finish the flat piece by slumping it into a bowl, as originally planned, and hope for the best.   Aesthetically, it looks OK.  Functionally it will work fine.  Financially, it is probably right up there with Waterford crystal for cost.  Once again......lesson learned! 

Made my annual April trip to the Post Office so that I could hand-carry our state tax return into the lobby and have the envelop hand cancelled with the date.  The woman behind the desk seemed amused, then double stamped the envelop and turned it 180 for my review - all with a big smile.  That the most pleasant "April envelop hand-cancelling event" I have ever experienced!  Hope you were able to find a pleasant aspect to your annual tax ritual!

Thursday, April 14, 2016

And the Final Product is..........................

The arrowhead shard and the stringer stayed true to color but, as in the first piece, the two small squares were strikers and changed colors.   Once again, the glass provides an "in your face" reminder that it is all about the chemistry! 

Scrap pendant using two known strikers after full fusing.
In the art world, we were taught that color is all about reflected light.  The water lilies of Monet and the olive groves of VanGogh provide impressionistic examples used by teacher after teacher, beginning early
in the elementary school art room (thank God we had an art ROOM! with an ART TEACHER.)

Scrap pendant using two known strikers after full fusing.
Although I took a year of honors chemistry in high school, about the closest I got to color was when I grew crystals for a project about molecular structures.  The part about glass strikers that is still unclear to me is - why doesn't the glass change to its' final color the first time it is in a molten state?  Almost all of the sheet glass that is available to glass artists has been heated, poured and rolled into sheets.  Why doesn't the entire sheet "striker" the final color at that time? 

Scrap pendant using two known strikers before full fusing.
The color of the striker is actually different, depending on the firing temperature.  The yellow square in the piece above, for example, would be a bright yellow (the color of the stringer,) when fired at 1150 degrees F (a low-slump temperature), be pumpkin orange when fired at 1375 degrees F (a tack fuse temperature), but turn a scarlet red when full-fused at 1480 degrees F. 

There is truly more to glass than 'meets the eye!"